by Sarra Zoghlami
Introduction
SimForm offers the functionality to create company accounts allowing organizations to manage app usage, purchase and share credits, and monitor authorized users’ account activity. This article provides a comprehensive guide for team managers on managing company accounts in SimForm, including step-by-step instructions on adding users, sharing credits, administering user access, and understanding account usage.
Creating a Company Account
Company accounts have more privileges than individual accounts, allowing you to invite and manage multiple users, allocate credits, and monitor app usage. A company account is exclusively available as a paid account. To create a company account, you must first sign up to the SimForm application and create an administrative account associated with your organization. To do that:
- Browse to the SimForm app web site https://simform.app/en/ and click Free trial.
- Type the following account credentials:
- An administrator email address that you will use to login to your company account.
- A password that you will use to login to your company account.
- Your company name.
- The account name, for example, your company name or the administrator username.
- A phone number associated to your company account.
- Select the company location from the Country/Region list.
If your company has multiple business locations, select the location associated with SimForm users. - Review the Terms of Service and Privacy policy, and select the I agree to the Terms of Service & Privacy Policy check box.
- Click Create.
You are now signed into the SimForm application with a trial account. To use it as a company account, you must either upgrade to a paid subscription or make a one-time purchase of credits.
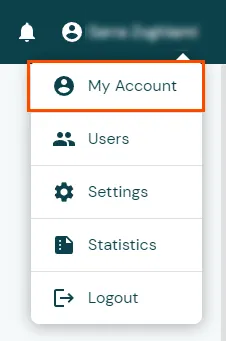
- On the top border bar, click your account name and select My Account.
- On the My Account page, select a subscription plan or a one-time purchase to add credits to your account.
- Click Subscribe or Buy and follow the checkout procedure to enter your payment information.
You now have a SimForm paid account that you can use as a company account by adding more users. As the administrator, you hold the role of managing the company account, which includes adding more users, sharing credits with them and monitoring the app usage.
Adding Users to the Company Account
Once you create the company account, you as the administrator has the authority to add users to the account. You can invite team members by providing their email addresses within the SimForm application. To invite users:
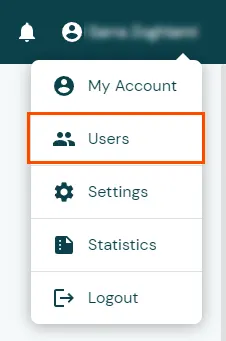
- On the top border bar, click the account name and select Users.
- On the Users page, click INVITE USERS.
- In the Invite Users to Company Account window, type the user email and click the + sign to add the users one by one.
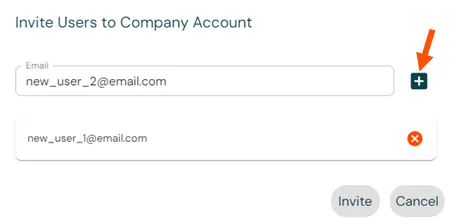
You can click x to delete a user from the added users list. - Click Invite.
Invited users receive an email notification with an invitation code and instructions to join the company account.
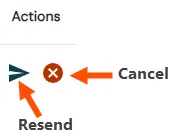
The app adds all invited users to the Pending Invitations table where you can resend or cancel the invitation.
When users accept the invitation, their names are added to the Users in Company Account table that displays the usernames, emails, and roles. Team members can draw credits from the company’s shared pool of credits.
You can click the x sign to remove a user account from the Users in Company Account table. Once a user is removed, they are no longer part of the company account team and cannot pull credits from the company pool.
Monitoring Account Usage
SimForm provides tools to the Company Account to monitor and understand the usage patterns among all users within the company account. As an admin, you can access usage summaries, which offer insights into the number of projects created, job submissions, and credits utilization. You can generate summaries for specific time periods or filtered based on project tags, allowing you to analyze project distribution across various categories or customers to bill them for the simulations run for their projects.
- On the top border bar, click the account name and select Users.
- On the Users page, click to open the Users Statistics window where you can manage the numbers of projects and jobs created by each user.
- Select the date range for which you would like to display the statistics.
- The Users Projects table lists the names, projects and job counts for each user.
- (Optional) In the Users Project tab, click Export to CSV to export the usage statistics in CSV format.
- Click the Tags Projects tab to open the Tags Projects table that lists the tags used and the number of projects containing each tag for all the users.
- You can click Export to CSV to export the tags projects statistics in CSV format.
Controlling Credit Visibility
As a company account administrator, you have the flexibility to decide whether to hide the total credits available to other users or keep it displayed.
- On the top border bar, click your account name and select My Account.
- In the Configuration group, clear the Display Credits for Invited Users check box to hide the credit, or leave it checked to keep the credit displayed.
Conclusion
Managing company accounts in SimForm provides organizations with centralized control, and empowers administrators to effectively manage their organization’s SimForm account and ensure optimal resource utilization by inviting team members, monitoring account usage, and analyzing project distribution.